Doro PMR walkie talkie key lock

How to lock and unlock the key lock on a Doro PMR walkie talkie:

  • Press and hold the power button
  • Press UP button

This way the locked symbol is toggled.

Anytone AT-D878UV not displaying roaming channel – fixed!

When I got my first Anytone AT-D878UV in 2019 the roaming function used to display which channel it had roamed onto but later on, probably after a firmware upgrade this disappeared rendering the roaming function rather useless.

This continued even though I switched to the latest AT-D878UVII Plus. I recently asked a friend who also got the latest model if he had the same problem – which he hadn’t.

This made me suspect that this is an error that had occurred in my codeplug and continued to exist even though I’ve switching models (since the RDT-files are upward compatible I didn’t bother to make a new codeplug for the new radio, so I just opened the RDT-file from the old one).

So I exported everyting on my current codeplug to CSV-files, went into the CPS and made a new codeplug, imported the CSV files and walked through Optional settings to set up everyting as I wanted. Then wrote the new codeplug to the radio and guess what – now it displays the channel it is roaming on!

TigerTronics TigerTrak TM-1 configuration under Windows 10

This little APRS-tracker from the late 90’s or early 00’s is a neat little device, however pretty old. It uses an external GPS receiver (via RS232) and connects to a radio, like a HT for example.

According to the manual, the configuration utility runs under Windows 95 or 98 (yes, indeed old stuff). I have a TM-1 lying in a box collecting dust so I figured that I should fire it up and see if I could use it for something fun (today APRS is gaining some attention again since many new radios has analog APRS rx and tx build in, like the Anytones).

It turned out that it worked fine under Windows 10. I used an USB to RS232 adapter. In the device manager, find the COMx-port adapter, under Properties -> Port -> Advanced, I had to select COM1 to COM4 since the old software just supports these ports.

I installed it and right clicked on the program file for the TigerTrak configuration utility and selected Compatibility -> Win 95 (not shure if this is needed but I did it anyway).

To connect the TM-1 to the configuration utility, first start the utility. With the TM-1 connected to the serial port (straight cable), power it on while holding PWR and MODE simultaneusly. The software should indicate CONNECTED and the LOCK led on the TM-1 should go green.

As special path 1 i used WIDE1-1 and special path 2 WIDE2-2. This will cause packets received by a WIDE digitpeater to repeated two hops. If that is overkill (like in an urban area with many digipeaters) you could use WIDE2-1 to limit it to one WIDE hop instead.

Nowadays there is a specific TOCALL for TigerTrak units: APTIGR

HP EliteDesk 800 G1 running on 12 volts DC

Running HP EliteDesk 800 G1 USDT on 13.8 volts DC

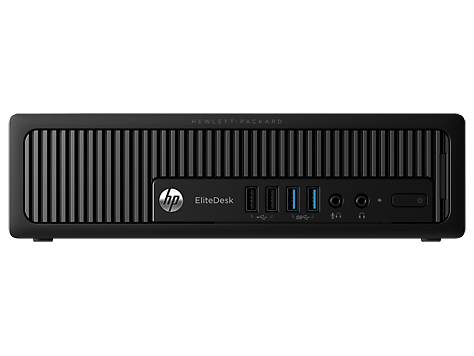
I got a HP EliteDesk 800 G1 USDT Ultra Slim Desktop computer for my ham schack. This is a small computer running on an external power supply just lika a laptop. It turned out to be the major source of RFI in my ham schack.

HP EliteDesk 800 G1 USDT

I suspected the power supply was the culrpit as those are switched ones and thought it might be possible to run the computer directly on my 13.8 VDC power supply that I use for my radios. The only voltages used in a computer is 12 and 5 volts, so there is probably a voltage regulator on the power input that regulates the voltage down from the 19 volts DC that the power supply outputs. Will it also run on 13.8 VDC?

Read more: Running HP EliteDesk 800 G1 USDT on 13.8 volts DC

The power cable to the HP EliteDesk 800 G1 USDT has a 3 pole connector, just the same as on laptops. One is negative, one is positive and the pin in the middle is a “power good” signal from the power supply. I read about people running 3rd party power supplies by connecting the power good over a resistor to the positive side, see this page.

Will it run if I just connect the power good to positive without a resistor? When I measured the voltages from the original power supply positive was +19 VDC and power good read about +12 VDC so it might be sufficient. Discussing it with a tech savvy friend, he suggested it might work and be worth a try.

I didn’t want to cut the cable on the original power supply but luckily I have a friend who hoardes old technical stuff and he happened to have an old broken HP laptop power supply, with the correct cable (who saves broken power supplies?, well it turned out to be useful in this case)

It works!

It turned out it works fine, no resistor needed. This might vary from model to model, but the HP EliteDesk 800 G1 USDT it works by directly connecting power good to the positive. This (image below) is the cable I now use to run my computer directly on 13.8 VDC. Black lead is negative, white is positive and blue is power good.

On 20 meters (14 MHz) my noise floor dropped from S5 to S0-A1!

HP EliteDesk 800 G1 running on 12 volts DC
Power cable to run a HP EliteDesk 800 G1 directly on 13.8 volts DC
IC-706 noise level on 20 m when running computer directly on 12 VDC
IC-706 noise level on 20 m (14 MHz) when running computer directly on 13.8 VDC
com0com virtual serial ports

Virtual com port / serial port for Windows 10

Sometimes it can be handy to create virtual com port pairs or virtual null modem using software. There are several solutions available, free and paid. The commercial softwares do work but with prices like 130 USD it is a bit out of range for a hobby project.

However, I found a project called com0com which is free. This software works well with Windows 10, both 32 and 64-bit versions available.

com0com virtual serial ports
Zello

How to run Zello on Mac OSX

Unfortunately there is no version of Zello available for Mac OSX but it is possible to run the Windows version using Wine.

  • Download and install XQuartz version >= 2.7.7
  • Log out and log back in on your Mac
  • Download and install “Wine stable
  • Download “Zello for PC
  • Launch Finder, go to Programs and run “Wine stable”
  • In the wine terminal window do
    cd Downloads
    wine ZelloSetup.exe
  • The Zello setup process will install Zello and launch it. The next time you want to run Zello, launch Finder, go to Programs and run “Wine stable” and enter
    wine C:\\Program\ Files\ \(x86\)\\Zello\\Zello.exe