HP Proliant “Hardware RAID support is disabled via NVRAM Configuration Setting”

I got my hands on a used HP Proliant server with P420i raid controller, however was unable to create a logical raid drive using the ACU. A message while booting shows “Hardware RAID support is disabled via NVRAM Configuration Setting“. It turns out the raid had been disabled by enabling hba mode.

This can be solved but it is a bit tricky. I used information from the following sources:

https://systemausfall.org/wikis/howto/Disable%20HP%20Proliant%20Hardware-RAID

http://downloads.linux.hpe.com/SDR/project/mcp/

https://wiki.debian.org/HP/ProLiant#HP_Repository

https://cdimage.debian.org/debian-cd/current-live/amd64/iso-hybrid/

  1. Connect one of the network ports to a switch on a LAN where you have a DHCP server and and Internet connection (so you don’t have to fiddle with manual network configuration).
  2. From another computer, download Debian Live ISO. I used the “standard” version (link above).
  3. Boot the server on Debian Live either by making a bootable stick or mounting it via ILO (I had to use Firefox, in Chrome the ISO was unmounted mid process)
  4. When booted on the Debian Live do:
    sudo nano /etc/apt/sources.list
  5. Add the line to the file and save it (CTRL-X):
    deb http://downloads.linux.hpe.com/SDR/repo/mcp jessie/current non-free
  6. Add the keys for the repository:
    sudo curl http://downloads.linux.hpe.com/SDR/hpPublicKey1024.pub | apt-key add -
    sudo curl http://downloads.linux.hpe.com/SDR/hpPublicKey2048.pub | apt-key add -
    sudo curl http://downloads.linux.hpe.com/SDR/hpPublicKey2048_key1.pub | apt-key add -
    sudo curl http://downloads.linux.hpe.com/SDR/hpePublicKey2048_key1.pub | apt-key add -
  7. Install ssacli:
    apt-get install ssacli
  8. Check the status (you will se hbamode true somewhere):
    ssacli controller slot=0 show
  9. Disable hbamode:
    ssacli controller slot=0 modify hbamode=off
  10. Now reboot the server, remove the USB stick or ISO using ILO and press F5 during boot to start the ACU. Now you should be able to create a logical raid drive.
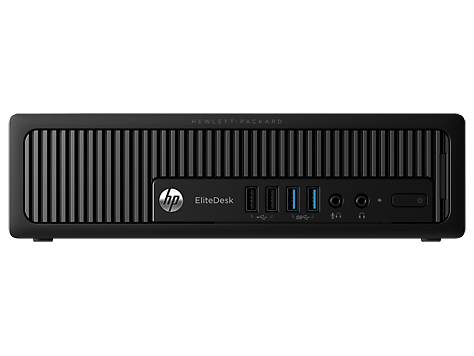
HP EliteDesk 800 G1 running on 12 volts DC

Running HP EliteDesk 800 G1 USDT on 13.8 volts DC

I got a HP EliteDesk 800 G1 USDT Ultra Slim Desktop computer for my ham schack. This is a small computer running on an external power supply just lika a laptop. It turned out to be the major source of RFI in my ham schack.

HP EliteDesk 800 G1 USDT

I suspected the power supply was the culrpit as those are switched ones and thought it might be possible to run the computer directly on my 13.8 VDC power supply that I use for my radios. The only voltages used in a computer is 12 and 5 volts, so there is probably a voltage regulator on the power input that regulates the voltage down from the 19 volts DC that the power supply outputs. Will it also run on 13.8 VDC?

Read more: Running HP EliteDesk 800 G1 USDT on 13.8 volts DC

The power cable to the HP EliteDesk 800 G1 USDT has a 3 pole connector, just the same as on laptops. One is negative, one is positive and the pin in the middle is a “power good” signal from the power supply. I read about people running 3rd party power supplies by connecting the power good over a resistor to the positive side, see this page.

Will it run if I just connect the power good to positive without a resistor? When I measured the voltages from the original power supply positive was +19 VDC and power good read about +12 VDC so it might be sufficient. Discussing it with a tech savvy friend, he suggested it might work and be worth a try.

I didn’t want to cut the cable on the original power supply but luckily I have a friend who hoardes old technical stuff and he happened to have an old broken HP laptop power supply, with the correct cable (who saves broken power supplies?, well it turned out to be useful in this case)

It works!

It turned out it works fine, no resistor needed. This might vary from model to model, but the HP EliteDesk 800 G1 USDT it works by directly connecting power good to the positive. This (image below) is the cable I now use to run my computer directly on 13.8 VDC. Black lead is negative, white is positive and blue is power good.

On 20 meters (14 MHz) my noise floor dropped from S5 to S0-A1!

HP EliteDesk 800 G1 running on 12 volts DC
Power cable to run a HP EliteDesk 800 G1 directly on 13.8 volts DC
IC-706 noise level on 20 m when running computer directly on 12 VDC
IC-706 noise level on 20 m (14 MHz) when running computer directly on 13.8 VDC

How can I use a PC to recover data when my Synology NAS malfunctions?

Purpose

This article will guide you to recover data on your PC when Synology NAS malfunctions.

Notes:

The drives may not be able to mount the volume again after being migrated to a new NAS.

Environment

  • Available on DSM version 6.2.x and above.
  • Only applicable to ext4 or Btrfs file system.
  • Ubuntu version should be 18.04 and above.

Resolution

  1. Make sure your PC has sufficient drive slots for drive installation.
  2. Remove the drives from your Synology NAS and install them in your PC. For RAID or SHR configurations, you must install all the drives (excluding hot spare drives) in your PC at the same time.
  3. Prepare an Ubuntu environment by following the instructions in this tutorial.
  4. Go to the Files on the left bar and select Home.
  5. Right-click and select New Folder, and create one or more folders as mount points for accessing data.1
  6. Right-click on the new folder(s), click Properties, the parent folder with folder name is ${mount_point}.
    Example: If the parent folder is /home/ubuntu/ and the folder name is Test, the mount point will be /home/ubuntu/Test/.
  7. Go to Show Application in the lower-left corner > Type to search….
  8. Enter Terminal in the search bar and select Terminal.
  9. Enter the following command to obtain the root privileges.

sudo -i

  1. Enter the following commands to install mdadm and lvm2, both of which are RAID management tools. lvm2 must be installed or vgchange will not work.

apt-get update
apt-get install -y mdadm lvm2

  1. Enter the following command to assemble all the drives removed from your Synology NAS. The results may differ according to the storage pool configurations on your Synology NAS.

mdadm -Asf && vgchange -ay

  1. Enter the following command to get the information of ${device_path}.

cat /proc/mdstat
lvs

According to the output of pvs/vgs/lvs, the device paths are as follows:

${device_path}
No lvs output/dev/${md}2
With lvs output/dev/${VG}/${LV}3

Below are the samples of md status corresponding to its RAID and volume type:

Device PathsClassic RAID with single volume
cat /proc/mdstatroot@ubuntu:~# cat /proc/mdstat Personalities : [raid1] md4 : active raid1 sdc3[0] 73328704 blocks super 1.2 [1/1] [U] unused devices:<none>
lvsNo output
${device_path}/dev/md4
Device PathsSHR with single volume
cat /proc/mdstatroot@ubuntu:~# cat /proc/mdstat Personalities : [raid1] md3 : active raid1 sda5[0] 73319616 blocks super 1.2 [1/1] [U] unused devices:<none>
lvsroot@ubuntu:~# lvs LV VG Attr LSize Pool Origin Data% Meta% Move Log Cpy%Sync Convert lv vg1000 -wi-a—– 69.92g
${device_path}/dev/vg1000/lv
Device PathsClassic RAID/SHR with multiple volume
cat /proc/mdstatPersonalities : [raid1] md3 : active raid1 sdc3[0] sdd3[1] 73328704 blocks super 1.2 [2/2] [UU] unused devices:<none>
lvsroot@ubuntu:~# lvs LV VG Attr LSize Pool Origin Data% Meta% Move Log Cpy% Sync Convert syno_vg_reserved_area vg1 -wi-a—– 12.00m volume_1 vg1 -wi-a—– 30.00g volume_3 vg1 -wi-a—– 30.00g
${device_path}/dev/vg1/volume_1
/dev/vg1/volume_3
  1. Enter the following commands to mount all the drives as read-only to access your data. Enter your device path (according to RAID and volume type in Step 12) in ${device_path} and mount point (created in Step 6)in ${mount_point}. Your data will be placed under the mount point.

$ mount ${device_path} ${mount_point} -o ro

  1. Check the data in Files > Home > the folders you created in Step 5.

If you still cannot recover the data through the above steps, refrain from trying any other methods to repair because it may cause more damage to your data. As your last option, please seek the help of a local data rescue company. Kindly understand that data retrieval is still not guaranteed.

Notes:

  1. A mount point is equal to one volume. If you have multiple volumes that need to be recovered, please create the same number of folders as the number of volumes.
  2. The number of md (array) will be listed in the result of cat /proc/mdstat.
  3. syno_vg_reserved_area can be ignored, the number of volume_x is equal to the number of volumes.
Cisco RV160 RFI fix

Cisco RV160 RFI-problems [fixed]

Being an amateur radio operator (or HAM-radio operator) I need to use electronic devices with as low radio emissions as possible in order to keep a low noise level on the shortwave bands (or HF-bands). I found out that my Cisco RV160 router was one of the major sources of radio noise (RFI or Radio Frequency Interference) in my home. It turned out it was easily fixed as the culprit was not the router in itself, but it’s power supply.

The router runs on 12 volts DC (original power supply rated up to 1,5A) which is often available in the ham schack already. So in that case, get rid of the original power supply and hook up the router to your 12 volts DC supply in the shack. In my case, the router was located in another part of the house so I just replaced the power supply with another, transformer based power supply. In my case, a Mascot 6823, rated for 12 volts DC, 1A (intermittently up to 1,3A). Even though not the same amp rating as the original, it seems to be sufficient.

Toshiba laptop green blinking LED light

A Toshiba laptop I encountered recently was deemed “possibly dead”. It would not boot and screen was just black.

A blinking green LED was present, meaning the battery is discharged. Further investigation revealed that the power supply electric cord had fallen out of the socket.

Plugging it in again turned the blinking green LED to solid orange, meaning the laptop was charging and just pushing the power button made it boot up normally.

Sometimes the problems are too simple 🙂

Samsung SL-M3375FD scan to email and SMB stopped working

Samsung multi function laser printer SL-M3375FD could suddenly not send email (scan to email) and SMB shares stopped working. Logging in to the printer web interface, using the test function for the SMTP settings just resulted in “failed” when it tried to authenticate to the email server.

Recently the email server’s SSL-certificate was updated because it was about to expire and about this time the scan to email stopped working.

The solution was simply to update the printer firmware. It was running a firmware from 2014 but updating to the latest one download here solved the problem both concerning email and SMB shares.

Latest iLO2 firmware for HP Proliant DL380 Gen 5

When looking for the latest iLO2 firmware for HP Proliant DL380 Gen 5 on the HPE website I found version 2.27 dated in 2015. To resolve browser issues with modern browsers I wanted to find a later firmware.

On this site you will find an exellent collection of all the latest iLO firmwares: https://pingtool.org/latest-hp-ilo-firmwares/

The latest listed iLO2 firmware is 2.33 dated march 2018 (when writing this post). The download links leads to HP sites so it should be legitimate. However, when unpacking the archive and investigating the Readme-file, only Gen 6 servers where listed.

HP Proliant iLO2 firmware

HP Proliant iLO2 firmware

It turns out the firmware works fine on my DL380 Gen 5 iLO2. Upgrade had to be done through Microsoft Internet Explorer 11, otherwise when trying to upgrade through other browsers I got the error message “iLO 2 firmware update has not started.” described here. The simple solution was to upgrade through MSIE 11.

Disclaimer: I can’t garantuee this will work for you or not get you in trouble with your system using the above procedure. It is just a description of what worked for me.


What Supermicro motherboard model does my server have?

When getting the latest IPMI firmware for your Supermicro server, you need to know what model of the motherboard your server has. Often the server lives in a datacenter somewhere and you don’t want to go there, take down the server, pull it out of the rack and investigate it. If you are running Linux on it, you can simply check the dmesg log for “Supermicro”.

grep Supermicro /var/log/dmesg

Supermicro motherboard model

Supermicro motherboard model

HP Procurve MSM422 / MAP-625 clients flow the dhcp server [solved]

A client was using the HP Procurve MSM422 / MAP-625 MultiService Access Point (wifi). It was being used in a rather crowded wifi environment and the problem was the wifi clients keept reconnecting and renegotioating so often that the DHCP server was overflowed, sometimes with DHCP requests every few seconds. They had been struggling with the problem for a couple of months and the focus was aimed at the DHCP requests.

It turned out that the problem was not in the DHCP negotiation at all, but was caused by the wireless clients that keept losing connection and each time when they reconnected a DHCP request was sent.

The client was misinformed, that 5 GHz band was prohibited in the country where it was set up (which is acutally not). So both radios (radio 1 and 2) where set to 2,4 GHz where radio 1 was set to 802.11n/b/g and radio 2 with 802.11b/g.

Furthermore, for radio 2 the value of the Antenna gain was set to the maximum which is 29 dBi in an attempt to boost the maximum power out of the system. However, this field works the opposite. In order to be regulatory compliant and not emit more than the allowed power, this field informs the system that it is connected to an antenna with 29 dBi gain, so to not emit illegal levels of power (output power + antenna gain), the system will reduce the actual output power (i.e. the power input to the antenna) by 29 dBi. But the system was using the internal antennas which, I guess, has more or less no antenna gain. This caused the system to actually emit -29 dBi, i.e. a very weak wifi signal.

The low power output made it hard for the wifi clients to “hear” the access point, which caused them constantly to lose connection and when reconnecting, they were sending a DHCP request, hogging down the DHCP server.

Solution:

  • Radio 1 was configured to use the 5 GHz band. This band is much less crowded than the 2,4 GHz band and the bandwidth is better, so when a client has the possibility, it is preferred if it can use the 5 GHz band.
  • Radio 2 was configured to use Internal Antenna with 0 dBi antenna gain.

Settings used when the problem was solved like this (click on the image to enhance it):

HP Procurve MSM422 MAP-625

HP Procurve MSM422 MAP-625

bigclivedotcom Youtube channel

bigclivedotcom is a Youtube channel operated by Clive from Isle of Man. He dissects and investigates all kinds of electronics stuff, mostly ordered from questionable eBay sources. If you are into electronics this is a really enjoyable channel.