Find out what real code a php eval(gzinflate(base64_decode contains

When you are dealing with a hacked or otherwise compromised website where someone has installed a backdoor or other kinds of malicious code you will often find php files with code packed into non-readable format using php eval, like eval(gzinflate(base64_decode.

To find out what the code does, copy the entire eval code (including “eval(“) into this site: http://ddecode.com/phpdecoder/

You will in the end get a human readable version of the code. Usually nasty stuff.

How to read a Mac disk or memory stick in a Windows computer

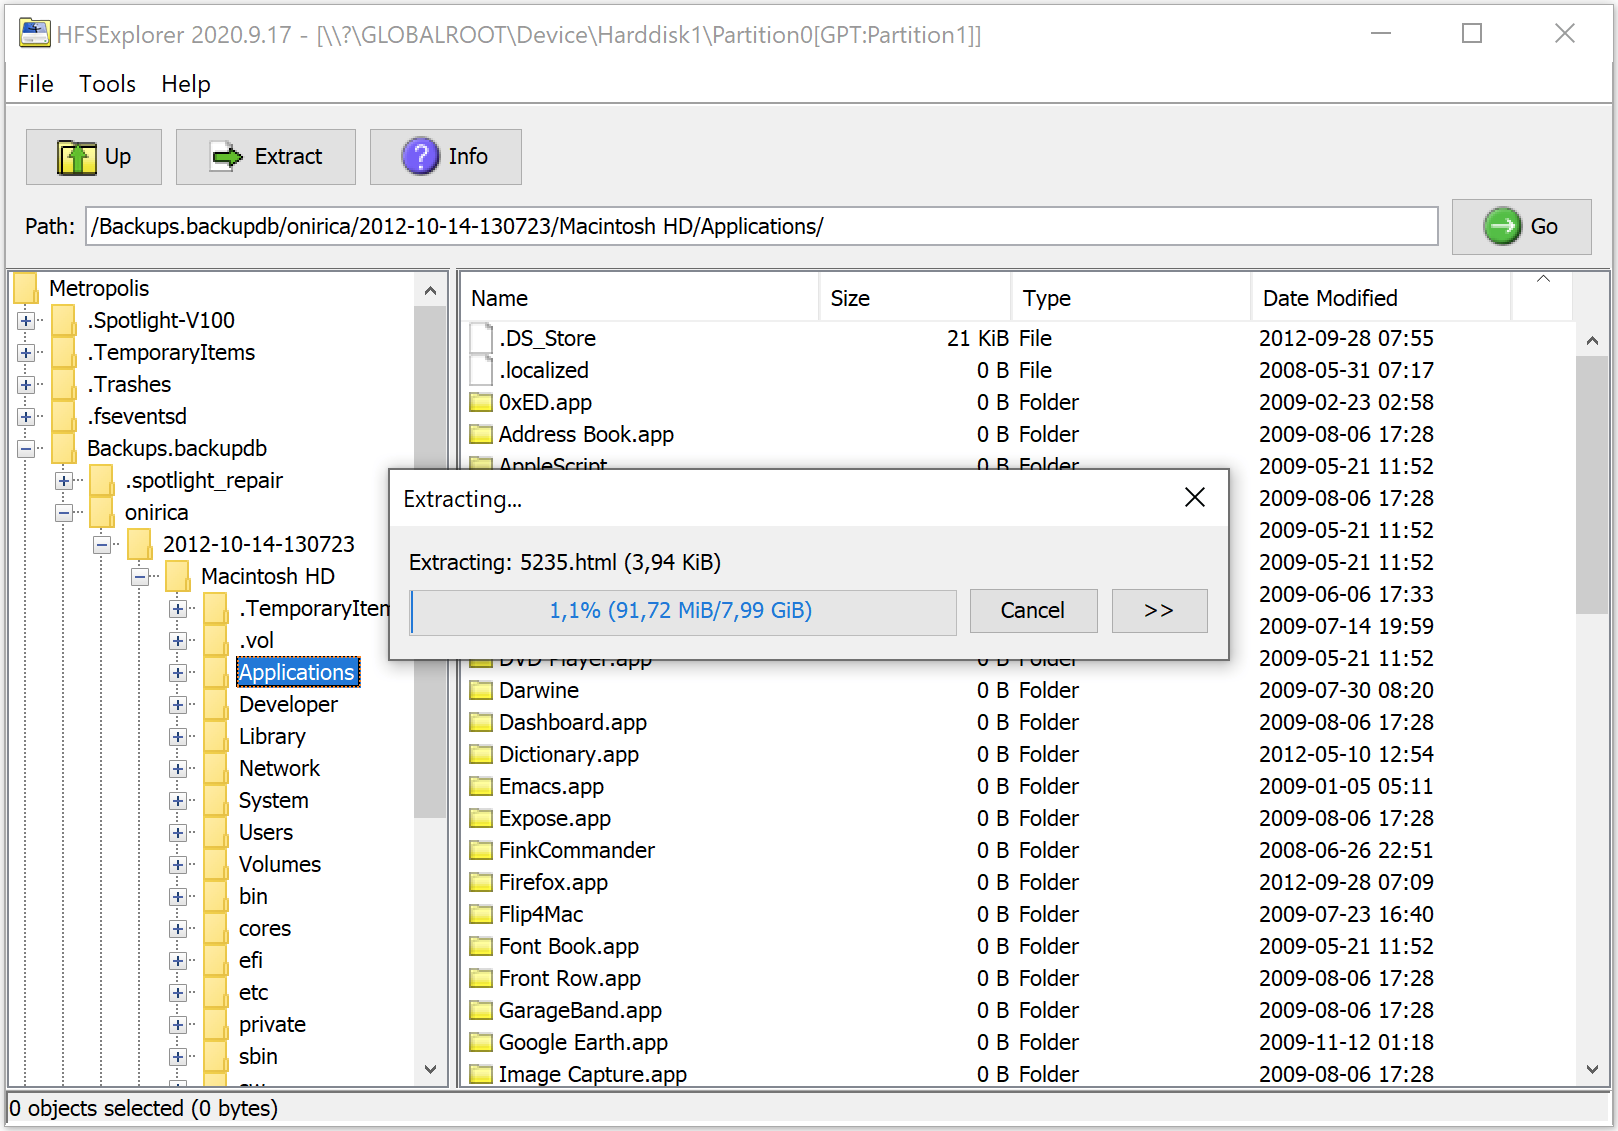
USB memory sticks or external disks that has been formatted on a Mac might not be readable if you connect it to a Windows computer. The reason is that the Mac has formatted it using a file system unknown by Windows.

To read the disk you can use the free tool hfsexplorer.

hfsexlorer

hfsexlorer

How to combine multiple .vcf files into one

If you have your contacts exported into .vcf files, they can easily be imported into for example iCloud, Google or your email program. However, if you have a couple of hundreds or thousands of contacts, and equally amount of .vcf files it will be very inefficient to import each contact one by one.

A solution is to combine all contacts into one single .vcf file. By importing the combined .vcf file all your contacts are imported at once.

To combine all .vcf files into a single one can easily be done using a Windows command prompt (cmd).

cd directory-path-where-your-vcf-files-are-located
copy *.vcf allcontacts.vcf

Now import the file allcontacts.vcf into iCloud or similar.

Magento2 System Upgrade fails via Setup Wizard – Error in Update!

When trying to upgrade Magento from 2.0.2 to 2.0.4 I got a windows saying Update in progress and the last line from the system log says “./composer.json has been updated” then nothing more happens for quite a long time. Finally an error screen displays “Error in Update!”.

To restart the update process while trying to figure out the error i had to manually delete the files var/.maintenance.flag and var/.update_in_progress.flag.

Magento System Upgrade error

Magento System Upgrade error

To make Magento run in Apache we had set php.ini for the web user to memory_limit=1024M and according to instructions, the cron jobs should be called with the -c pointing to the php.ini used by the web server, in our case /etc/php5/fpm/php.ini.

No error message revealed why the update failed but I found out that the php.ini we used for cron (/etc/php5/fpm/php.ini) had a memory_limit=128M. By editing this file and increasing it to 1024M the update worked.

Magento and always_populate_raw_post_data readiness test fails

When running the Magento readiness test it failed with the message that always_populate_raw_post_data should be set to -1 since it is running under php 5.6. Even though I tried different methods of setting it to -1 and I could verify it by calling phpinfo(); Magento still complained.

The way I solved is a bit rough and it required that I had full system administrator access to the machine (which I had because it was a dedicated server). This is how I solved it:

echo "always_populate_raw_post_data=-1" > /etc/php5/mods-available/always_populate_raw_post_data.ini
php5enmod always_populate_raw_post_data
service php5-fpm restart
service apache2 restart

Magento “Cron readiness check failed” solved

First of all, check the Magento guide on this problem here.

In my case, at first I didn’t get any errors in the cron logs in <web-root>/var/log. When running the scripts by hand as the website user I got the not so informing “Cron readiness check failed” in the <web-root>/var/log/update.cron.log.

The reason the “Cron readiness failed” was actually due to some files in the file and directory structure in the web root that can not be written by the cron update script. In my case I used the AWstats package to create website statistics placed in a directory called /stats. This directory and it’s file was not writeable by the cron script, causing it to fail, even though the directory /stats and it’s files are not a part of Magento.

I discovered this by investigating the content of the file var/.update_cronjob_status. In this file you can find important information on why the cron update script is failing.

postgrey whitelisting outlook.com

Greylisting is a way of reducing the amount of incoming spam and virus emails, in addition to other counter measures. Postgrey is a good choice if you are running postfix.

However, to be able to recieve emails from senders using outlook.com you need to whitelist it. This is because outlook.com is using a different host on each try to deliver the mail, causing delays up to hours, days or the mail not being delivered at all within time limits.

Create/edit the file /etc/postgrey/whitelist_clients.local and add:

# outlook.com
/^.*\.outbound\.protection\.outlook\.com$/
/^.*\.prod\.outlook\.com$/

Then execute:

service postgrey reload

Edit December 2021: The rule is changed from /^mail-.*\.outbound\.protection\.outlook\.com$/ to /^.*\.outbound\.protection\.outlook\.com$/ as Microsoft has changed their server naming standard.

How to export mailman mailinglist subscribers

There is no built-in function to export the mailinglist subscriber in mailman. If you want to migrate to another software or move to another mailman installation you are in need to export the subscribers. I found this to be the easiest way:

  1. Log in to your mailman mailinglist administration panel, like http://hostname/cgi-bin/mailman/admin/mylist
  2. Replace “admin” with “roster” in the URL in the address bar and press enter, like http://hostname/cgi-bin/mailman/roster/mylist
  3. The subscribers are listed in a bulleted list with the @ sign replaced by ” at “. Mark the list in the browser, right click the selection and “Copy”
  4. Open a plain text editor, like notepad if you are running Windows (avoid Word, Wordpad, LibreOffice writer etc since you will also paste a lot of text attributes in those editors, use a plain text editor)
  5. Right click in the editor and select “Paste”
  6. Search and replace, normally by pressing CTRL-H. Search for ” at ” and replace it with “@” (without the “”) and click “Replace all”.
  7. Save the file

If you are moving the subscriber list into another mailman installation:

  1. In the text editor above, right click and “Select all” to select all text (the list of the subscribers) and then right click and “Copy”
  2. In the administration panel of the new mailman installation, click on “Membership management
  3. Click on “Add new members to the list
  4. In the top box where you can type email addresses one per line, right click and “Paste”
  5. Set “Send welcome message to new members” to “No” (unless you really want mailman to send an email welcoming all the subsrcibers you are adding)
  6. Click “Save” in the bottom of the page

Connecting a Windows client to a WebDAV drive

There are several third party products available to connect a Windows client to a WebDAV drive. This guide will explain how to do it with using native Windows and has been tested using Windows 7 but should work for other versions too. For Windows server 2003, Windows XP and Vista users, you first need to download a web folders patch from Microsoft.

It is a recommendation that you connect to the WebDAV drive using encryption (SSL), i.e. https. If you have a real, non self signed, certificate for your host, you’re good to go (the one that makes they key symbol in your browser show locked, green and give no warnings). Just skip down to the section describing how to setup the connection.


Using a self signed SSL certificate

If you are using a self signed SSL certificate, or signed by a non trusted certificate authority (CA), you will get the error message “An unexpected network error occurred” when trying to connect the WebDAV drive.

If you are using a self signed certficate, make sure it is issued for the hostname you are accessing the WebDAV drive through. If not, you must create a new certificate issued for the hostname of your WebDAV host. No workaround on that part as far as I know.

When you have a self signed certificate for your WebDAV hostname installed on your WebDAV server you must add the certificate on the client. This is how you do it:

  1. Run Internet Explorer as Administrator (right click on it and select “Run as administrator”)
  2. Go to your WebDAV host by entering the hostname in the address bar, like https://mywebdavhost (make sure you use https:)
  3. Select “Continue to this website (not recommended)”
  4. Click on the “Certificate error” displayed in red in the address bar
  5. Click on “View certificates”
  6. Click on “Install certificate”
  7. Click on “Next” in the Import wizard
  8. In the next step, select “Place all certificates in the following store” and click “Browse”
  9. Select “Trusted Root Certification Authorities” and click OK
  10. Click “Next”
  11. Answer “Yes” to the security question


Setting up Windows to map a network drive using native WebDAV

When your SSL certificate is sorted out (either by using a real certificate or a self signed one using the above steps), you are ready to map the network drives.

  1. Start the file manager, for example by clicking the Start menu and then click on “Computer”
  2. In the top of the file manager window, click on “Map network drive”
  3. Select folder letter, for example Z:
  4. The folder, enter the URL of your WebDAV host, like https://mywebdavhost
  5. Select “Connect using different credentials” and optionally “Reconnect at logon”
  6. Click “Next”
  7. Enter the WebDAV host user name and password and if you previously selected “Reconnect at logon” it can be a good idea to select “Remember my password”
  8. Click “OK”

Joomla Update component missing

Sometimes the Joomla Update component is missing in the Components menu in the backend. A workaround has been to use the extension manager and paste the update package URL and make the update that way.

But when updating to Joomla 3.5.0 that method is not possible. A quick solution, if the Joomla Update component is present but just not displayed in the menu, is to call the URL to the component directly. In the address bar of your web browser, enter:

http://yoursite.com/administrator/index.php?option=com_joomlaupdate

Now you can do the Joomla version update.

To solve the problem on a more permanent basis (i.e. to get it back into the Component menu in the backend), see this article.